Changing guitar strings is an essential step to maintain good sound quality and a smooth playing experience. Here are the detailed steps:
1. Prepare Tools and Materials
- A set of new strings
- Tuner
- Wire cutters or scissors
- String winder (optional)
- Bridge pin puller (for acoustic guitars)
2. Loosen the Old StringsUse the tuner to loosen each string. Turn the tuning pegs counterclockwise to release the tension on the strings.

3. Remove the Old StringsFor electric or electric-acoustic guitars: Remove the strings from both the bridge and the tuning pegs.
For acoustic guitars: Use the bridge pin puller to gently remove the bridge pins, then take the strings out of the bridge and tuning pegs.


4. Clean the GuitarBefore installing new strings, take the opportunity to clean the fretboard and body of the guitar with a soft cloth to remove dust and sweat.
5. Install the New StringsAttach at the bridge: Insert the new string into the bridge hole and press the bridge pin back in (for acoustic guitars) or attach the string at the bridge (for electric guitars).
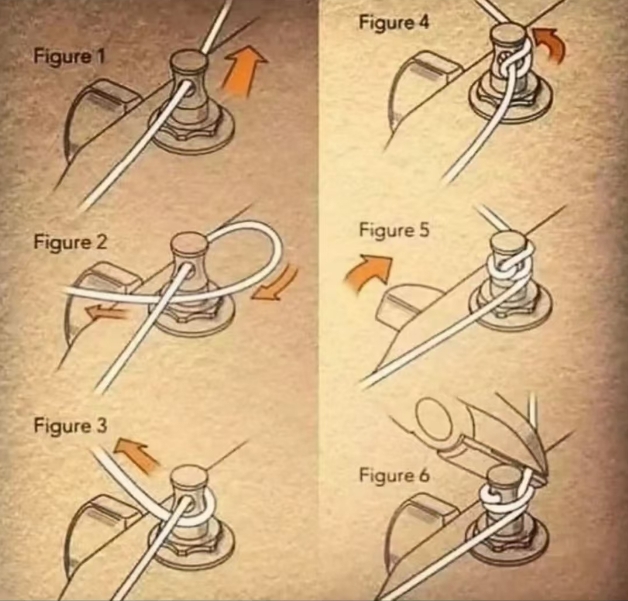
Attach at the tuning pegs: Thread the string through the tuning peg hole, leaving some slack, then start tightening the string by turning the tuning pegs clockwise.

6. Stretch and Adjust the StringsOnce all strings are in place, use the tuner to bring each string up to the correct pitch. After tuning, gently stretch the strings to help them settle and reduce the need for frequent tuning.


7. Trim the Excess StringAfter the strings are properly tuned and stretched, use wire cutters to snip off the excess string, keeping the headstock neat.
8. Final TuningOnce all the strings are changed and trimmed, use the tuner for a final tuning adjustment.
Tips
It's recommended to change one string at a time, especially for acoustic guitars, to maintain consistent tension on the bridge.
New strings may need time to settle, so frequent tuning might be necessary in the first few days after changing them.
Hope these steps help you!


